Archive for the ‘ 3D ’ Category

SoundCanvas Introduction – Managing Audio in Unity5

ScreenShot

During the production of our internal game project at DreamSocket, I started creating a tool to bridge the gap between the new audio Mixer technology in Unity5 and the audio clips themselves.  The mixer and snapshots features of Unity5 are brilliant for designing your sound in a scene – everything you could ever want to really bring the sound design of your game to life.

The problem is, and has been for along time with Unity, how to manage a scene’s audio clips?  These are clips that *have* to be added to an object or scene physically rather than programmatically.  I say *have* to, but that’s really not the case from a developers point of view.  We can add sound and design the sound programmatically to our hearts content.

The problem is, we’re the ONLY ones who can work with the sound in a scene at that point and a sound designer is essentially at our mercy to implement his work accurately.  And to be honest, doing sound design with a “listen/stop/adjust code/play/repeat” model isn’t going to probably yield the best results.  Being able to mix and manage at design time in the editor is by far a much better solution.

This is where SoundCanvas comes in.

SoundCanvas is not only an audio API for controlling your game’s sound, but a Unity editor extension that allows you (or anyone else on your team) to design your scene’s audio in a central, easy to use, interface.

Some of the features:

  • Easy to use API for controlling sound playback, use snapshots for transitions and globally manage your games audio
  • Assign single audio clips to multiple game objects using tags
  • Assign multiple audio clips to single or multiple game objects
  • An easy way to marry audio clips with mixer groups
  • Change the target of an audio clip by simply changing what tags it targets
  • Creates and manages it’s own enum file for easy of use with the sound API

Currently, SoundCanvas is in development, but our goal is to release it via the Unity Asset Store as a free Editor Extension.  So until then, we’d love to hear feedback and reaction to what we have so far.

Have a bandit day!

Showing camera view frustrum in Scene view

We’ve been working on a 2D game in Unity3D and I’d written this a while back to show the view frustrum of the camera in the scene view and had been meaning to post it:

Yellow wireframe outlines view frustrum. Top is scene view, bottom is game view

Create a new c# script in Unity and call it “DrawCameraViewFrustrum.cs”.  Copy/paste the code below and attach it to your camera object in your scene.

using UnityEngine;
using System.Collections;

public class DrawCameraViewFrustrum : MonoBehaviour
{</pre>
#if UNITY_EDITOR
	public static Vector2 GetMainGameViewSize()
	{
		System.Type T = System.Type.GetType("UnityEditor.GameView,UnityEditor");
		System.Reflection.MethodInfo GetSizeOfMainGameView = T.GetMethod("GetSizeOfMainGameView",System.Reflection.BindingFlags.NonPublic | System.Reflection.BindingFlags.Static);
		System.Object Res = GetSizeOfMainGameView.Invoke(null,null);
		return (Vector2)Res;
	}
	#endif

	public static DrawCameraCull instance;
	public Color color = new Color(0.1f, 0.14f, 0.8f, 0.5f);
	public bool isZoomed = false;

	protected float unitsWidth = 8.95f;
	public float zoomedOrthoSize = 2f;

	protected float camVertExtent;
	protected float camHorzExtent;

	protected Transform playerTransform;
	protected Camera cam;
	protected Vector2 topRightCorner;
	protected Vector2 screenExtents;

	void Awake(){
		instance = this;
	}

	public void Start(){

		cam = GetComponent&lt;Camera&gt;();

		topRightCorner = new Vector2(1, 1);
		screenExtents = cam.ViewportToWorldPoint(topRightCorner);

		CheckCameraView();
	}

	public void ToggleZoom(){
		isZoomed = !isZoomed;

		if( isZoomed ) {
			cam.orthographicSize = zoomedOrthoSize;
			UpdateExtents();
		} else {
			cam.transform.position = new Vector3(0,0,-10);
			CheckCameraView();
		}
	}

	public void Reset(){
		isZoomed = false;
		cam.transform.position = new Vector3(0,0,-10);
		CheckCameraView();
	}

	protected float camX;
	protected float camY;
	protected float leftBound;
	protected float rightBound;
	protected float bottomBound;
	protected float topBound;
	public void Update(){

	}

	#if UNITY_EDITOR
	public virtual void OnDrawGizmos()
	{	
		//if( Application.isPlaying ) return;

		CheckCameraView();

		Gizmos.color = color;

		Matrix4x4 temp = Gizmos.matrix;
		Gizmos.matrix = Matrix4x4.TRS(transform.position, transform.rotation, Vector3.one);
		if (GetComponent&lt;Camera&gt;().orthographic) {
			float spread = GetComponent&lt;Camera&gt;().farClipPlane - GetComponent&lt;Camera&gt;().nearClipPlane;
			float center = (GetComponent&lt;Camera&gt;().farClipPlane + GetComponent&lt;Camera&gt;().nearClipPlane)*0.5f;
			Gizmos.DrawWireCube(new Vector3(0,0,center), new Vector3(GetComponent&lt;Camera&gt;().orthographicSize*2*GetComponent&lt;Camera&gt;().aspect, GetComponent&lt;Camera&gt;().orthographicSize*2, spread));
		} else {
			Gizmos.DrawFrustum(Vector3.zero, GetComponent&lt;Camera&gt;().fieldOfView, GetComponent&lt;Camera&gt;().farClipPlane, GetComponent&lt;Camera&gt;().nearClipPlane, GetComponent&lt;Camera&gt;().aspect);
		}
		Gizmos.matrix = temp;
	}

	#endif

	protected void OnLevelWasLoaded(int level) {
		CheckCameraView();
	}

	protected void CheckCameraView(){

	}

	protected void UpdateExtents(){
		//if( !Application.isPlaying || Application.loadedLevel == 0 ) return;

		// update the extents
		camVertExtent = cam.orthographicSize;
		camHorzExtent = cam.aspect * camVertExtent;

		leftBound   = -screenExtents.x + camHorzExtent;
		rightBound  = screenExtents.x - camHorzExtent;
		bottomBound = -screenExtents.y + camVertExtent;
		topBound    = screenExtents.y - camVertExtent;
	}
<pre>}

How to split animations via script in Unity3D Editor

If you’ve purchased a set of 3D models (let’s say, a pack of zombie models) that come with an animation list, then you know what a pain it is to sit and add each animation name/start/end frame in the editor.  It’s not always necessary, but in this particular occasion, I had to do it for each model.

Thanks to someone over at Automation Systems Group, I was able to use one of their scripts ( with a slight edit for an error due to legacy code ) in the editor to add the animation clips via a text file.

The code below explains everything essentially, including how to format the txt file:


// FbxAnimListPostprocessor.cs : Use an external text file to import a list of

// splitted animations for FBX 3D models.
//
// Put this script in your "Assets/Editor" directory. When Importing or
// Reimporting a FBX file, the script will search a text file with the
// same name and the ".txt" extension.
// File format: one line per animation clip "firstFrame-lastFrame loopFlag animationName"
// The keyworks "loop" or "noloop" are optional.
// Example:
// 0-50 loop Move forward
// 100-190 die

using UnityEngine;
using UnityEditor;
using System.Collections;
using System.IO;
using System.Text.RegularExpressions;
using System;

public class FbxAnimListPostprocessor : AssetPostprocessor
{
 public void OnPreprocessModel()
 {
 if (Path.GetExtension(assetPath).ToLower() == ".fbx"
 && !assetPath.Contains("@"))
 {
 try
 {
 // Remove 6 chars because dataPath and assetPath both contain "assets" directory
 string fileAnim = Application.dataPath + Path.ChangeExtension(assetPath, ".txt").Substring(6);
 StreamReader file = new StreamReader(fileAnim);

 string sAnimList = file.ReadToEnd();
 file.Close();

 if (EditorUtility.DisplayDialog("FBX Animation Import from file",
 fileAnim, "Import", "Cancel"))
 {
 System.Collections.ArrayList List = new ArrayList();
 ParseAnimFile(sAnimList, ref List);

 ModelImporter modelImporter = assetImporter as ModelImporter;
 modelImporter.clipAnimations = (ModelImporterClipAnimation[])
 List.ToArray(typeof(ModelImporterClipAnimation));

 EditorUtility.DisplayDialog("Imported animations",
 "Number of imported clips: "
 + modelImporter.clipAnimations.GetLength(0).ToString(), "OK");
 }
 }
 catch {}
 // (Exception e) { EditorUtility.DisplayDialog("Imported animations", e.Message, "OK"); }
 }
 }

 void ParseAnimFile(string sAnimList, ref System.Collections.ArrayList List)
 {
 Regex regexString = new Regex(" *(?<firstFrame>[0-9]+) *- *(?<lastFrame>[0-9]+) *(?<loop>(loop|noloop| )) *(?<name>[^\r^\n]*[^\r^\n^ ])",
 RegexOptions.Compiled | RegexOptions.ExplicitCapture);

 Match match = regexString.Match(sAnimList, 0);
 while (match.Success)
 {
 ModelImporterClipAnimation clip = new ModelImporterClipAnimation();

 if (match.Groups["firstFrame"].Success)
 {
 clip.firstFrame = System.Convert.ToInt32(match.Groups["firstFrame"].Value, 10);
 }
 if (match.Groups["lastFrame"].Success)
 {
 clip.lastFrame = System.Convert.ToInt32(match.Groups["lastFrame"].Value, 10);
 }
 if (match.Groups["loop"].Success)
 {
 clip.loop = match.Groups["loop"].Value == "loop";
 }
 if (match.Groups["name"].Success)
 {
 clip.name = match.Groups["name"].Value;
 }

 List.Add(clip);

 match = regexString.Match(sAnimList, match.Index + match.Length);
 }
 }
}

Fish GL Released

Fish GL Tank

Fish GL Tank

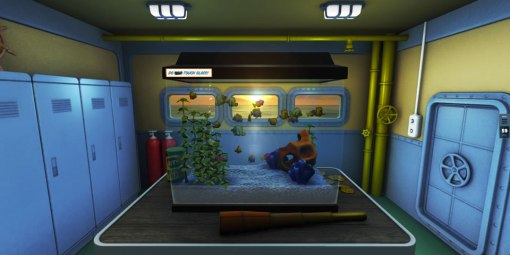
Well for the past 2 months I’ve been tucked away working on my first official WebGL project – FishGL (www.fishGL.com, www.fishgl/mobile for mobile)!  The Internet Explorer team wanted to create a graphics showcase with the classic “fish bowl” theme and enlisted ThinkPixelLab.com to create the experience along with Scott Wetterschneider as the 3D artist.

The Fish Tank has many interactive features and elements that bring and rich experience to not only the desktop, but to touch devices as well.  In fact, you’ll have the most fun with the Fish Tank if you’re on a touch device since it has features that allow you to pan and zoom around the room, tap the glass, feed the fish and even SWIM with the fish!  There’s also a couple of nice easter-eggs for those of you who like to explore.

Some features include:

  • Swim in tank (click diver mask on panel)
  • Add fish to the tank with the fish dial
  • Set algae level with “last cleaned” slider
  • Tap the glass to scatter fish
  • Feed the fish by tapping the food jar
  • Turn the lights on and off with the light switch on the wall
  • Advanced panel gives you a TON of options for customizing the scene (hit the second dot at the top of the panel to switch to the advanced panel)
  • Real-time lighting from the sun and tank light as well as shadows (turn shadows on via the advanced panel)
  • Change clean/dirty water tint for in-tank swimming experience.  To see the change, change the amount of algae in the water while simming
  • Change color of light in the tank as well as its intensity, distance
  • Change the tank glass to your liking
  • Work with the realism of the gravel in the tank
  • … and so much more!

You can create a tank that matches your mood, room, computer, phone or whatever you like:

If you had told me 6 months ago that I would be working on a WebGL project, I would have laughed you of my office waving my Unity3D banner!  But God has been good and blessed me with some awesome people to work with at ThinkPixelLab.com – namely, Robby Ingebretsen and Joe Fillmore.  Super cool people, extremely talented in what they do and very patient!

If you’re interested in creating 3D WebGL content, I’d encourage you to look at the Three.js library – the api’s nomenclature and approach is right inline with other technologies like Unity3D, so getting up and running is very easy.


Creating Cube map / Environment map in Three.js with preloaded assets

[tweetmeme source=”neoRiley” only_single=false] All the Three.js samples I found were all using the same technique of just passing the image URL’s in an array to  ImageUtils.loadTextureCube() , and used whatever it returned as the necessary texture for a environment, reflection or refraction map.  Well, I’d written an AssetManager to preload all necessary assets for creating our scene, and when it came time to assemble the reflection map, I had to dig through the source code to see what ImageUtils.loadTextureCube() was actually producing and how.

In my scenario, I have a class that is called CubeMap and after passing it the image URL’s, it takes care of preparing what is to be preloaded with the AssetManager.  When the AssetManager has completed the preload, I then have access to CubeMap.texturesArray, which is an array of the preloaded images, and I can then put together the environment map texture I need:

// create a new THREE.Texture
var envMap = new THREE.Texture();

// After preloading your images, set the image property of your new texture to the array of images you preloaded
envMap.image = this.tankReflectionBox.texturesArray; // array of images = [];

// Set the mapping type
envMap.mapping = new THREE.CubeReflectionMapping();

// You have to set this to false, otherwise your images will be inverted on the Y axis
envMap.flipY = false;

// Mark as dirty, otherwise you won't see anything
envMap.needsUpdate = true;

Have a bandit day!

Error with Three.js shader – ERROR :GL_INVALID_OPERATION – fix

[tweetmeme source=”neoRiley” only_single=false] I was just in the process of trying to narrow down what does and doesn’t work in IE11 with Three.js’ shaders and ran into this error message while working with the normalmap shader:

ERROR :GL_INVALID_OPERATION : glDrawElements: attempt to access out of range vertices in attribute 1

The fix is to simply call computeTangents() on your mesh’s geometry object, and bingo, we’re in business:

model.geometry.computeTangents();

Here’s the block for context:

var shader = THREE.ShaderLib[ "normalmap" ];</pre>
var uniforms = THREE.UniformsUtils.clone( shader.uniforms );

uniforms[ "enableAO" ].value = false;
uniforms[ "enableDiffuse" ].value = true;
uniforms[ "enableSpecular" ].value = true;

uniforms[ "tDiffuse" ].value = fdo.colorMap;
uniforms[ "tNormal" ].value = fdo.normalMap;
uniforms[ "tSpecular" ].value = fdo.specularMap;

uniforms[ "diffuse" ].value.setHex( 0xFFFFFF );
uniforms[ "specular" ].value.setHex( 0xFFFFFF );
uniforms[ "ambient" ].value.setHex( 0x222222 );

uniforms[ "shininess" ].value = 10;
parameters = { fragmentShader: shader.fragmentShader, vertexShader: shader.vertexShader, uniforms: uniforms, lights: true };
mat = new THREE.ShaderMaterial( parameters );

model.geometry.computeTangents();
model.material = mat;

WebGL Helicopter update

Ok, I know videos are only so good and you probably want to try the real thing – I get it!  It’s almost there!  I just have to clean up a few things to make it not so frustrating because flying the helicopter in and of itself will probably most frustrating 😉  If you ever played Battlefield 1942 with the Desert Combat mod and learned how to fly the helicopters there, this will be JUST like that.  I loved flying the helicopters in that game – and ever since then it’s just gone down hill.  They keep putting baby controls on the stupid things and it just ruins the cool factor IMO.  Yeah it was hard to fly, but once you got it, you owned just about anyone and everyone in the game.

Anyway, I originally mimic’d the physics and that worked ok, but then thought why not dive into a javascript physics engine and really get dirty.  So, I picked up Ammo (which is a straight API port of Bullet) and armed with very little in terms of documentation and examples was able to mimic the flight experience I’d created in Unity3D.  I’ll definitely be posting some examples and explanations of things I learned so sit tight for that – I’ll definitely attempt to de-mystify using Ammo as much as I can.

Goo Create IDE

If you saw the earlier post where I had an industrial area, you’ll notice that this time the scene is completely different.  I wanted to play with the different shaders and post processing affects and after playing with Goo I was inspired to recreate the scene I’d created there, here.  Goo definitely makes it a million times easier to achieve this look (another post for another time).  The floor is a mirror which has a nice subtle smoke / noise map and the only effect I applied was a vignette.  The performance so far is good at 60fps, but after adding the skyscrapers it’s starting to show signs of hitting the performance cap.

At this point, my overall impression of WebGL development is both inspiring and disappointing and somewhat cruel.  Documentation is probably my biggest gripe.  For Ammo, I had to go to Bullet’s API and docs and for examples, I just had to search the web for anyone who might have used Threejs with Ammo.  Thankfully, there was just enough to answer the basic questions, but it was tedious to say the VERY least.  Don’t get me started about browser issues and simple things like locking the mouse – I mean geez, really?? is that so much to ask a browser to do?  I have it working, but was astonished to find this wasn’t something supported up until recently and even then it’s only the main browsers (shocker, I thought I’d left all this crap back in the late 90’s? – why people are anti-plugin is beyond me, talk about wasted hours in QA?! oye!)

Ok, I’ll rant later and rave as well.  There’s good and bad of course, but the bottom line is, I at least enjoyed myself and the challenge has taken me back to the days when Papervision3D was just starting and we had no idea how to do many of the things we developed.  So that part is really very cool 😉

I promise – I’ll get the link up soon for you guys to try!

WebGL Helicopter Demo – Controls

It’s funny how things in life prompt you to change course or learn something new.  If you’d asked me a month ago about WebGL and if I’d be doing it, I would have surely said “no”.  But, after talking to 2 different agencies about contract work recently, I quickly realized that WebGL was catching fire to a certain extent.  Then, after talking to Carlos Ulloa about it, I realized I had a lot more experience with this type of 3D development than I realized.  After years of Papervision3D development, I found I was right at home with WebGL development.  It’s very similar to many of the techniques and limitations of Flash/3D development, with the nice twist of Javascript and browser incompatibilities thrown in… as if it wasn’t difficult enough to write 3D games/apps!

So naturally I dove in head first with a helicopter simulation 😉  I’ll be able to release this by the beginning of next week hopefully

Enjoy!

Starting New!

PinkyIconWell, it’s time to start fresh on a few fronts!

First, I’m now looking for a new position in Unity3D with another shop.  My time with Infrared5 has finally concluded after 6+ wonderful years there!  So, if you know of any shops looking for Unity3D developers or have need of a contractor, please drop me an email!

Second, Save Pinky!  has received MANY updates and is in for review by Apple right now [update: it’s just been approved and is live in the app store now!]- I’m hoping it’ll go live by mid January at the latest.  But the downloads continue to astonish me!  We’re getting well over 150 a day most days and the GameCenter leader board count is well over 12,000!  What’s even more, there are TWO players who have posted scores over 1000!!!!  what?!  Incredible!!  My high score is 635, and I can’t imagine hanging on for another 800 holes!!  But I’m so glad people have enjoyed it like I have, and with the new ramps and balls, they should have even more fun with it.

Third, I updated my blog to a new more clean look and cleaned up some of the images/icons on the right menu for my iOS game titles, and I have made a commitment to start adding more content related to C#, Unity and Flash this coming 2014!

Enjoy the screenshots from my work in the past 6+ years with Infrared5!

This slideshow requires JavaScript.

GetRandomInDonut() – Random location in a donut area

[tweetmeme source=”neoRiley” only_single=false]The scenario is: you’ve got a player object, and you want to spawn enemy characters away from the player, but within a range.  Basically, within a donut area, right?

using UnityEngine;
using System.Collections;

public class Utils
{
    public static Vector3 GetRandomInDonut(float min, float max)
    {
        float rot = Random.Range(1f, 360f);
        Vector3 direction = Quaternion.AngleAxis(rot, Vector3.up) * Vector3.forward;
        Ray ray = new Ray(Vector3.zero, direction);

        return ray.GetPoint( Random.Range(min, max) );
    }
}

To use it, just call it with the minimum and maximum distance away you want your new position to be. Then add it to the transform of where your player’s spawn point is:

public void LoadCharacters()
{
    // add the transform's position since the returned position is from a location of Vector3.zero
    Vector3 pos = transform.position + GetRandomInDonut(20f, 50f);
}