SoundCanvas Introduction – Managing Audio in Unity5

ScreenShot

During the production of our internal game project at DreamSocket, I started creating a tool to bridge the gap between the new audio Mixer technology in Unity5 and the audio clips themselves.  The mixer and snapshots features of Unity5 are brilliant for designing your sound in a scene – everything you could ever want to really bring the sound design of your game to life.

The problem is, and has been for along time with Unity, how to manage a scene’s audio clips?  These are clips that *have* to be added to an object or scene physically rather than programmatically.  I say *have* to, but that’s really not the case from a developers point of view.  We can add sound and design the sound programmatically to our hearts content.

The problem is, we’re the ONLY ones who can work with the sound in a scene at that point and a sound designer is essentially at our mercy to implement his work accurately.  And to be honest, doing sound design with a “listen/stop/adjust code/play/repeat” model isn’t going to probably yield the best results.  Being able to mix and manage at design time in the editor is by far a much better solution.

This is where SoundCanvas comes in.

SoundCanvas is not only an audio API for controlling your game’s sound, but a Unity editor extension that allows you (or anyone else on your team) to design your scene’s audio in a central, easy to use, interface.

Some of the features:

  • Easy to use API for controlling sound playback, use snapshots for transitions and globally manage your games audio
  • Assign single audio clips to multiple game objects using tags
  • Assign multiple audio clips to single or multiple game objects
  • An easy way to marry audio clips with mixer groups
  • Change the target of an audio clip by simply changing what tags it targets
  • Creates and manages it’s own enum file for easy of use with the sound API

Currently, SoundCanvas is in development, but our goal is to release it via the Unity Asset Store as a free Editor Extension.  So until then, we’d love to hear feedback and reaction to what we have so far.

Have a bandit day!

Showing camera view frustrum in Scene view

We’ve been working on a 2D game in Unity3D and I’d written this a while back to show the view frustrum of the camera in the scene view and had been meaning to post it:

Yellow wireframe outlines view frustrum. Top is scene view, bottom is game view

Create a new c# script in Unity and call it “DrawCameraViewFrustrum.cs”.  Copy/paste the code below and attach it to your camera object in your scene.

using UnityEngine;
using System.Collections;

public class DrawCameraViewFrustrum : MonoBehaviour
{</pre>
#if UNITY_EDITOR
	public static Vector2 GetMainGameViewSize()
	{
		System.Type T = System.Type.GetType("UnityEditor.GameView,UnityEditor");
		System.Reflection.MethodInfo GetSizeOfMainGameView = T.GetMethod("GetSizeOfMainGameView",System.Reflection.BindingFlags.NonPublic | System.Reflection.BindingFlags.Static);
		System.Object Res = GetSizeOfMainGameView.Invoke(null,null);
		return (Vector2)Res;
	}
	#endif

	public static DrawCameraCull instance;
	public Color color = new Color(0.1f, 0.14f, 0.8f, 0.5f);
	public bool isZoomed = false;

	protected float unitsWidth = 8.95f;
	public float zoomedOrthoSize = 2f;

	protected float camVertExtent;
	protected float camHorzExtent;

	protected Transform playerTransform;
	protected Camera cam;
	protected Vector2 topRightCorner;
	protected Vector2 screenExtents;

	void Awake(){
		instance = this;
	}

	public void Start(){

		cam = GetComponent&lt;Camera&gt;();

		topRightCorner = new Vector2(1, 1);
		screenExtents = cam.ViewportToWorldPoint(topRightCorner);

		CheckCameraView();
	}

	public void ToggleZoom(){
		isZoomed = !isZoomed;

		if( isZoomed ) {
			cam.orthographicSize = zoomedOrthoSize;
			UpdateExtents();
		} else {
			cam.transform.position = new Vector3(0,0,-10);
			CheckCameraView();
		}
	}

	public void Reset(){
		isZoomed = false;
		cam.transform.position = new Vector3(0,0,-10);
		CheckCameraView();
	}

	protected float camX;
	protected float camY;
	protected float leftBound;
	protected float rightBound;
	protected float bottomBound;
	protected float topBound;
	public void Update(){

	}

	#if UNITY_EDITOR
	public virtual void OnDrawGizmos()
	{	
		//if( Application.isPlaying ) return;

		CheckCameraView();

		Gizmos.color = color;

		Matrix4x4 temp = Gizmos.matrix;
		Gizmos.matrix = Matrix4x4.TRS(transform.position, transform.rotation, Vector3.one);
		if (GetComponent&lt;Camera&gt;().orthographic) {
			float spread = GetComponent&lt;Camera&gt;().farClipPlane - GetComponent&lt;Camera&gt;().nearClipPlane;
			float center = (GetComponent&lt;Camera&gt;().farClipPlane + GetComponent&lt;Camera&gt;().nearClipPlane)*0.5f;
			Gizmos.DrawWireCube(new Vector3(0,0,center), new Vector3(GetComponent&lt;Camera&gt;().orthographicSize*2*GetComponent&lt;Camera&gt;().aspect, GetComponent&lt;Camera&gt;().orthographicSize*2, spread));
		} else {
			Gizmos.DrawFrustum(Vector3.zero, GetComponent&lt;Camera&gt;().fieldOfView, GetComponent&lt;Camera&gt;().farClipPlane, GetComponent&lt;Camera&gt;().nearClipPlane, GetComponent&lt;Camera&gt;().aspect);
		}
		Gizmos.matrix = temp;
	}

	#endif

	protected void OnLevelWasLoaded(int level) {
		CheckCameraView();
	}

	protected void CheckCameraView(){

	}

	protected void UpdateExtents(){
		//if( !Application.isPlaying || Application.loadedLevel == 0 ) return;

		// update the extents
		camVertExtent = cam.orthographicSize;
		camHorzExtent = cam.aspect * camVertExtent;

		leftBound   = -screenExtents.x + camHorzExtent;
		rightBound  = screenExtents.x - camHorzExtent;
		bottomBound = -screenExtents.y + camVertExtent;
		topBound    = screenExtents.y - camVertExtent;
	}
<pre>}

UniSWF to Unity3D – Character Animation

This is a short tutorial I did for our internal group at DreamSocket on how to use a MovieClip with timeline animations (in this case, a character animation), with UniSWF, in Unity3D.  Thanks to Trevor Van Meter for the character animation for this demo!

How to split animations via script in Unity3D Editor

If you’ve purchased a set of 3D models (let’s say, a pack of zombie models) that come with an animation list, then you know what a pain it is to sit and add each animation name/start/end frame in the editor.  It’s not always necessary, but in this particular occasion, I had to do it for each model.

Thanks to someone over at Automation Systems Group, I was able to use one of their scripts ( with a slight edit for an error due to legacy code ) in the editor to add the animation clips via a text file.

The code below explains everything essentially, including how to format the txt file:


// FbxAnimListPostprocessor.cs : Use an external text file to import a list of

// splitted animations for FBX 3D models.
//
// Put this script in your "Assets/Editor" directory. When Importing or
// Reimporting a FBX file, the script will search a text file with the
// same name and the ".txt" extension.
// File format: one line per animation clip "firstFrame-lastFrame loopFlag animationName"
// The keyworks "loop" or "noloop" are optional.
// Example:
// 0-50 loop Move forward
// 100-190 die

using UnityEngine;
using UnityEditor;
using System.Collections;
using System.IO;
using System.Text.RegularExpressions;
using System;

public class FbxAnimListPostprocessor : AssetPostprocessor
{
 public void OnPreprocessModel()
 {
 if (Path.GetExtension(assetPath).ToLower() == ".fbx"
 && !assetPath.Contains("@"))
 {
 try
 {
 // Remove 6 chars because dataPath and assetPath both contain "assets" directory
 string fileAnim = Application.dataPath + Path.ChangeExtension(assetPath, ".txt").Substring(6);
 StreamReader file = new StreamReader(fileAnim);

 string sAnimList = file.ReadToEnd();
 file.Close();

 if (EditorUtility.DisplayDialog("FBX Animation Import from file",
 fileAnim, "Import", "Cancel"))
 {
 System.Collections.ArrayList List = new ArrayList();
 ParseAnimFile(sAnimList, ref List);

 ModelImporter modelImporter = assetImporter as ModelImporter;
 modelImporter.clipAnimations = (ModelImporterClipAnimation[])
 List.ToArray(typeof(ModelImporterClipAnimation));

 EditorUtility.DisplayDialog("Imported animations",
 "Number of imported clips: "
 + modelImporter.clipAnimations.GetLength(0).ToString(), "OK");
 }
 }
 catch {}
 // (Exception e) { EditorUtility.DisplayDialog("Imported animations", e.Message, "OK"); }
 }
 }

 void ParseAnimFile(string sAnimList, ref System.Collections.ArrayList List)
 {
 Regex regexString = new Regex(" *(?<firstFrame>[0-9]+) *- *(?<lastFrame>[0-9]+) *(?<loop>(loop|noloop| )) *(?<name>[^\r^\n]*[^\r^\n^ ])",
 RegexOptions.Compiled | RegexOptions.ExplicitCapture);

 Match match = regexString.Match(sAnimList, 0);
 while (match.Success)
 {
 ModelImporterClipAnimation clip = new ModelImporterClipAnimation();

 if (match.Groups["firstFrame"].Success)
 {
 clip.firstFrame = System.Convert.ToInt32(match.Groups["firstFrame"].Value, 10);
 }
 if (match.Groups["lastFrame"].Success)
 {
 clip.lastFrame = System.Convert.ToInt32(match.Groups["lastFrame"].Value, 10);
 }
 if (match.Groups["loop"].Success)
 {
 clip.loop = match.Groups["loop"].Value == "loop";
 }
 if (match.Groups["name"].Success)
 {
 clip.name = match.Groups["name"].Value;
 }

 List.Add(clip);

 match = regexString.Match(sAnimList, match.Index + match.Length);
 }
 }
}

Honda Fit Challenge Launched

Honda Fit Challenge

Developed By: BlitzAgency.comThinkPixelLab.com
Client: Honda
Roll: Lead Developer, Architect, Audio Engineer
Platforms: HTML5/Web
Tools: Phaser.js
URL: http://hondafitchallenge.honda.com/

This slideshow requires JavaScript.

Honda wanted to showcase their customer’s parking prowess with the Honda Fit Parking Challenge game.  The game was created with Phaser.js using PhysicsEditor to create the colliders for the levels.  Phaser made creating the game incredibly straight forward and easy and is an incredible open-source project for creating 2D HTML5 game titles.  Game performs exceptionally well on it’s target mobile platforms (any device that supports HTML5).

Honda Fit Challenge: All 8 Levels in under a minute

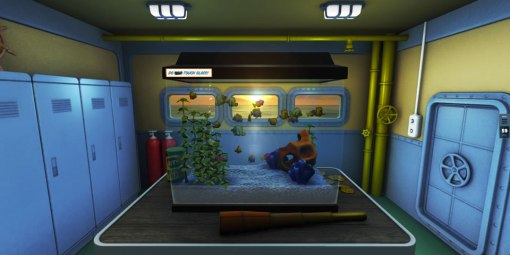
Fish GL Released

Fish GL Tank

Fish GL Tank

Well for the past 2 months I’ve been tucked away working on my first official WebGL project – FishGL (www.fishGL.com, www.fishgl/mobile for mobile)!  The Internet Explorer team wanted to create a graphics showcase with the classic “fish bowl” theme and enlisted ThinkPixelLab.com to create the experience along with Scott Wetterschneider as the 3D artist.

The Fish Tank has many interactive features and elements that bring and rich experience to not only the desktop, but to touch devices as well.  In fact, you’ll have the most fun with the Fish Tank if you’re on a touch device since it has features that allow you to pan and zoom around the room, tap the glass, feed the fish and even SWIM with the fish!  There’s also a couple of nice easter-eggs for those of you who like to explore.

Some features include:

  • Swim in tank (click diver mask on panel)
  • Add fish to the tank with the fish dial
  • Set algae level with “last cleaned” slider
  • Tap the glass to scatter fish
  • Feed the fish by tapping the food jar
  • Turn the lights on and off with the light switch on the wall
  • Advanced panel gives you a TON of options for customizing the scene (hit the second dot at the top of the panel to switch to the advanced panel)
  • Real-time lighting from the sun and tank light as well as shadows (turn shadows on via the advanced panel)
  • Change clean/dirty water tint for in-tank swimming experience.  To see the change, change the amount of algae in the water while simming
  • Change color of light in the tank as well as its intensity, distance
  • Change the tank glass to your liking
  • Work with the realism of the gravel in the tank
  • … and so much more!

You can create a tank that matches your mood, room, computer, phone or whatever you like:

If you had told me 6 months ago that I would be working on a WebGL project, I would have laughed you of my office waving my Unity3D banner!  But God has been good and blessed me with some awesome people to work with at ThinkPixelLab.com – namely, Robby Ingebretsen and Joe Fillmore.  Super cool people, extremely talented in what they do and very patient!

If you’re interested in creating 3D WebGL content, I’d encourage you to look at the Three.js library – the api’s nomenclature and approach is right inline with other technologies like Unity3D, so getting up and running is very easy.


Creating Cube map / Environment map in Three.js with preloaded assets

[tweetmeme source=”neoRiley” only_single=false] All the Three.js samples I found were all using the same technique of just passing the image URL’s in an array to  ImageUtils.loadTextureCube() , and used whatever it returned as the necessary texture for a environment, reflection or refraction map.  Well, I’d written an AssetManager to preload all necessary assets for creating our scene, and when it came time to assemble the reflection map, I had to dig through the source code to see what ImageUtils.loadTextureCube() was actually producing and how.

In my scenario, I have a class that is called CubeMap and after passing it the image URL’s, it takes care of preparing what is to be preloaded with the AssetManager.  When the AssetManager has completed the preload, I then have access to CubeMap.texturesArray, which is an array of the preloaded images, and I can then put together the environment map texture I need:

// create a new THREE.Texture
var envMap = new THREE.Texture();

// After preloading your images, set the image property of your new texture to the array of images you preloaded
envMap.image = this.tankReflectionBox.texturesArray; // array of images = [];

// Set the mapping type
envMap.mapping = new THREE.CubeReflectionMapping();

// You have to set this to false, otherwise your images will be inverted on the Y axis
envMap.flipY = false;

// Mark as dirty, otherwise you won't see anything
envMap.needsUpdate = true;

Have a bandit day!

Error with Three.js shader – ERROR :GL_INVALID_OPERATION – fix

[tweetmeme source=”neoRiley” only_single=false] I was just in the process of trying to narrow down what does and doesn’t work in IE11 with Three.js’ shaders and ran into this error message while working with the normalmap shader:

ERROR :GL_INVALID_OPERATION : glDrawElements: attempt to access out of range vertices in attribute 1

The fix is to simply call computeTangents() on your mesh’s geometry object, and bingo, we’re in business:

model.geometry.computeTangents();

Here’s the block for context:

var shader = THREE.ShaderLib[ "normalmap" ];</pre>
var uniforms = THREE.UniformsUtils.clone( shader.uniforms );

uniforms[ "enableAO" ].value = false;
uniforms[ "enableDiffuse" ].value = true;
uniforms[ "enableSpecular" ].value = true;

uniforms[ "tDiffuse" ].value = fdo.colorMap;
uniforms[ "tNormal" ].value = fdo.normalMap;
uniforms[ "tSpecular" ].value = fdo.specularMap;

uniforms[ "diffuse" ].value.setHex( 0xFFFFFF );
uniforms[ "specular" ].value.setHex( 0xFFFFFF );
uniforms[ "ambient" ].value.setHex( 0x222222 );

uniforms[ "shininess" ].value = 10;
parameters = { fragmentShader: shader.fragmentShader, vertexShader: shader.vertexShader, uniforms: uniforms, lights: true };
mat = new THREE.ShaderMaterial( parameters );

model.geometry.computeTangents();
model.material = mat;

NGUI for Unity

After interviewing with a few unity3D shops,I was hit with the same question every single time: “do you have NGUI experience?” – to which I replied “no, but I’m sure I can pick it up”. They didn’t share my optimism 🙂 Enter in NGUI for Unity!

What I love about e-books these days is their size and how concise they can be, and this book delivers not only on both counts, but sets you in motion with a very real world example project that covers a great portion of the capabilities of NGUI. Everything from the wizards to widgets to creating atlas’ and fonts is covered. The book isn’t exhaustive in its explanations but IS thorough in pointing out the features and properties of all the components it covers – which makes it easy to follow along with in the examples.

The author gets right to the meat of the matter immediately walking you step by step through the sample project. It helps to have Unity3D experience and you’ll have to understand the basics of how unity works with prefabs and code as this book is targeting unity devs looking for a solid UI framework. It IS written in a very practical manner so even a complete beginner could get something out of it.

Now, in thinking back about my response to potential clients about just “picking NGUI up”, I see how deep the framework really is. It’s much more than just a set of UI components, and this book really brought me up to speed in a very short amount if time – excellent work!

Find more information here

Save Pinky! now on Android

Well, it took a couple of weeks to integrate the android plugins in to the project to co-exist with the iOS plugins 😉 But overall the experience was very good and it runs excellent on android!

So if you’ve felt left out of the fun, now’s your chance to show those iOS players how Android players roll!

Get it